General Tips & Information
Click to jump to that section.:
[Renaming Figures in a Scene]
[Changing Figure Names (Within the cr2 File)] [Using Transparency Maps]
[Working with Textures] [To Anti-Alias or Not to Anti-Alias]
[File Formats for Textures] ["My Hair Moves When I Pose"]
[How to Make "Partner Poses"] [How to Make Your Own Thumbnail Files]
[Opening Files in a Text Editor (PC)] [Speed up Rendering in Poser 4]
When adding a new figure or object to a scene, the new figure usually has its own name (not the generic "Figure 1"). If not, you can give it a unique name, within Poser:
• Choose a figure in the "Libraries Palette" and click  (the "Add Library Preset" button).
• Next, click on the left-hand pull-down menu and select the object named "Figure x". Then, click on the right-hand pull-down menu and select "Body".
--Poser 4 and 5 users will find these pull-down boxes to the lower left, beneath the main document window.
--Poser 6 users will find these pull-down boxes to the upper left, just above the main document window and just below the "Preview" and "Render" tabs.
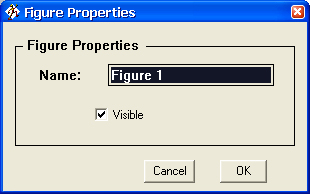
• Go to "Object" > "Properties".
--Poser 4 users should see the screen shot to the right.
--Poser 5 and 6 users should look on the Parameters Dial Palette- the "focus" will be on the "Name" field.
• In the "Name" field, give the object a name. For example, if the figure is the left shoe, call it "Left Shoe". (Yes, it's that easy.)
• To save the changed name:
--Poser 4 users should click the "OK" button to close dialog box.
--Poser 5 and 6 users can hit the "Enter" key or click anywhere else.
An important note: When adding figures to a scene, be careful not to double-click on the thumbnail image- always click the "Add Library Preset" button. Double-clicking the thumbnail image tells Poser to replace the current figure with the figure you just double-clicked. (And, yes, this comes from a typo in the Poser 5 manual which incorrectly tells users to double-click to add a figure.)
Side note: Poser 6 corrects this behavior: you can go to the Preferences and tell Poser whether you prefer the double-click action to be "Replace Figure" or "Add New Figure to Scene".
Have you ever noticed, that when you add a figure (such as clothing) to your scene, it's called something like "Figure 1" or "Figure 2"? Why do some figures (especially those made by Poser artists) have the correct name- a T-Shirt is called "T Shirt", not "Figure 3". Is this a deep, dark secret, known only by Poser-masters, and not even known by MetaCreations, the people who made Poser? As you've probably noticed, when you add any default clothing figure to the scene, none of them have a "correct" name.
Evidently, yes, this is a "deep, dark secret"- with the release of Poser 5 (in Sept 2002 and made by Curious Labs) and Poser 6 (April 2005, also made by Curious Labs), the naming convention has NOT changed. When you add any Poser 5 figure (and most Poser 6 figures) to a scene, it is still added as "Figure 1"!
Well, here it is- the secret is revealed... and, actually, it's fairly easy to rename figures. All you need is a text-editor!
• On the PC: NotePad will usually do the job, unless the file is too large, then you need to use WordPad. A good (advanced) editor is UltraEdit.
• On the Macintosh, SimpleText should do the job. A good (advanced) editor is BBEdit.
• Note: do not use word-processor programs (such as Word) since they tend to add extra characters.
• Note 2: this tip assumes you know the file locations of the figures you will be working with. If not, see the Poser File Formats and their locations section, above.
So how do we do it?
• First, until you get the hang of exactly what needs to be changed, you should ALWAYS either work with a back-up copy OR backup your data before changing it. If something is changed incorrectly, the file may become unreadable.
• Next, open your text editor.
• Then, open the file you want to edit (if there is a "file-type" filter, be sure to set it to "All Files").
For example, if we were going to edit the T-Shirt figure, we would go to the Runtime\Libraries\Figure\character\Clothing-Male folder and open the TShirt.cr2 file (of course, your file and folder names and file locations may vary).
Note: This is where you need to be very careful- you will now be looking at the actual code-definition of the the file.
Next, do a "Find" and look for the word "figure " (that's the word 'figure' with a space after it). Scroll down slightly and you should see the code that looks like this: (again, your actual code may vary)
figure
	{
	name    Figure 5
	root    BODY:39
	addChild    hip:39
			 BODY:39
	addChild    abdomen:39
			 hip:39
	addChild    lThigh:39
			 hip:39
	addChild    rThigh:39
			 hip:39
	defaultPick hip:39
|
<--- note: there is actually a
   space after the word "figure"
<--- this red line is the line we are
   interested in changing
|
Note: these lines have been color-coded for highlighting purposes. Your text editor won't colorize the the text.
• Look for the word after "name"- this will be the figure's name and the text that needs to be changed.
For example, if this were the code for the T-Shirt figure, we would replace the word "Figure 5" with the word "T-Shirt".
Note: capitalization and spacing matters- the figure's name can be all upper-case, all lower-case, or mixed case. It can contain a space or use the _ (underscore) character. It's completely up to you.
• This is the only place you need to change the name, so go ahead and save the file.
• Optional: close your text-editor.
• Now, switch over to Poser and add the figure to your scene. It should be added with its proper name!
• Optional: repeat the process with any and all of your Poser figure files.
Using Transparency Maps:
Although this topic is covered more in-depth on the Using Transparency Maps page, here are some things to remember when using transparency maps:
When creating the transparency map (in a paint program):
• Any area colored black will be 100% transparent.
• And the opposite is true: all white areas will be 100% opaque.
• And, therefore, any area colored a shade of gray will be semi-transparent. For example, using a 25% gray will result in a 25% opaque area.
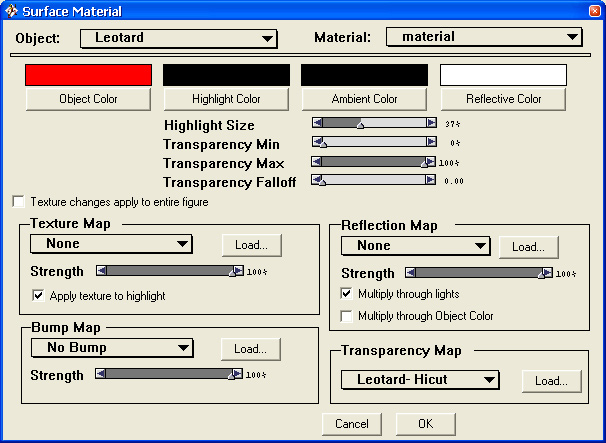
 Using the transparency map on an object (in Poser): Go to "Render" > "Materials".
• The Object Color can be any color.
• The Transparency Color MUST be set to black.
• The Transparency Max must be set to 100%.
• The Transparency Falloff must be set to 0.00.
Note: Keep in mind that you won't see the effects of the transparency map until you render the scene. This is how Poser handles objects with transparency maps (I don't know if it's a memory-saving issue or a specific design feature).
Very important note: These are the settings for Poser 4. The Materials settings have been radically changed in Poser 5. In Poser 6 (and above), however, you have the choice between the Poser 4-style Material Editor and the Poser 5-style Material Room.
Working with Textures:
"Textures" or "texture maps" are simply image files that correspond to the figure's shape. To create your own texture maps, use a program like UVMapper.
• Poser can read graphics files saved in the following formats: BMP, GIF, JPG, PCT, PSD, TIFF, PNG, and others.
• Although Poser may read textures located anywhere on your hard drive, it is generally accepted that all textures should be located beneath the Runtime\Textures folder.
• Note: Due to a bug (or glitch or known issue), Poser does NOT store the full path name of the texture used on the figure. This means that Poser will become "confused" trying to work with textures that have the same name (but in different folders). For example, two files- "Poser4\Runtime\Textures\P4Guy1\body.jpg" and "Poser4\Runtime\Textures\Guy1\good\body1.jpg" will confuse Poser- when you load your figure, it may or may not use the correct texture.
• Note 2: In Poser 6, however, this issue has been fixed: files are stored with the entire path name... so, yes, you can use different files from different Runtime folder!
|
To Anti-Alias or Not to Anti-Alias:
First, what is "anti-aliasing"? Basically, it is the way a computer smooths the edges of an object. Compare these two objects and notice the gray-scale edging on the figure to the right:
 |
 |
| An object without anti-aliasing. |
An object with anti-aliasing. |
So, when should you use anti-aliasing? The simple answer is that you should use it whenever you want a smooth edge. You should always use anti-aliasing in Poser when you want a "photo-realistic" result. If you are going for a "sketching" result, you may want to turn anti-aliasing off.
When you create a texture map or transparency map in a paint program, though, you should use your own discretion. On a texture map, you probably want the smooth edging for blended colors, but sharp edging for details such an emblem or design (for example, a superhero's costume). On a transparency map, you should use anti-aliasing to suit your own taste.
When you create your own texture maps or transparency maps, what file format should you use? After all, Poser supports many different file formats, including: BMP, GIF, JPG, PCT, PSD, TIFF, and others. Without getting into a long discussion of "lossy" versus "lossless" file compression, which file format is "best"?
If you are working on a texture map custom-designed for your own character, you can probably use the layered-file (from Photoshop or Painter) on your Poser character. Unfortunately, the layered-file takes up a lot of space on your hard drive. However, when you have finalized the texture map, you should "Save As.." another file format- I prefer the JPG format (with near-maximum quality). This results in a MUCH smaller file (4,100k for a layered-file versus 950k for the JPG file). And when you render the scene, any "data loss" in the coloring won't be seen.
Ah, but what about exporting rendered images? It really depends on what you want to do with the image, but for the most part, image editors (such as Photoshop) do a much better job of compressing the image than Poser. For this reason, you should export the image as a "lossless" image type, open it in Photoshop (or Paint Shop Pro), then add post-work or "Save for Web".
The next question that comes up is- what file type should you use? The common response has always been, "Export the image as a TIF and edit it in Photoshop." People use this file type since is the most lossless image type *and* Poser exports an alpha channel (for masking). While this is good, why not export the image as the obvious choice: if you're going to edit the image in Photoshop, export it as a Photoshop image!
"My Hair Moves When I Pose":
This seems to be a common complaint from a lot of my Poser characters. I put them in one pose, rethink the scene, and then put them in a second pose. And what happens when I apply the second pose? The hair goes flying off- usually about "2 feet" above the character! How did I fix this? Actually, the answer is very easy:
• After you add hair to your character: "Libraries" > "Hair" > (style) > "Apply Library Preset" (the  button). button).
• Color and add a Texture Map ("Render" > "Materials") and adjust the hair's settings (if there are any) to suit your character.
• Lock the hair in place: (the Hair object should still be selected) go to "Objects" > "Lock Actor".
Now, when the character is placed in any pose, the hair should stay on the head!
• Note: This process can also be used to "lock" a facial expression in place: simply apply the facial expression, select the character's head, "Lock Actor" and re-pose!
• Note 2: you will have to "Unlock" the object if you want to make any changes to it. Remember to re-lock it again before changing the pose of your character.
|
Poser 7 update:
• In Poser 7, some objects in the Hair Library (such as Sydney's hair) are actually conforming clothing!
• After you add the hair to the scene, you will need to conform it just like conforming clothing: go to Figure > Conform, select the figure, and click the "OK" button.
|
How to Make "Partner Poses":
For the longest time, I tried and tried to make "partner poses"- a set of poses for two people that are interacting with each other. I would position the figures just-so and then save the pose. But when I later tried to use the pose again, it wouldn't work. Every single time, the figures wouldn't even be close to each other.
Recently, however, I learned the "secret" to making this kind of pose work properly:
The trick is to position the characters using the hip, not the body. Instead of using the body's xRot, yRot, and zRot (for rotation), use the hip's Twist, Rotate, and Bend. Instead of using the body's xTran, yTran, and zTran (for location), use the hip's xTran, yTran, and zTran. (Note: be sure "Inverse Kinematics" is turned OFF when repositioning the hip.)
This way, the hip's settings will be saved with the pose (the body's settings are not saved). Now, no matter how much you reposition the two characters (by changing the body settings), the pose will always be correct (just be sure you reposition each character by the same amount).
(Special thanks goes to Schlabber for the help on this tip. Follow the links page and check out his site.)
How to Make Your Own Thumbnail (png) Files With a Background:
By now you you're probably asking, "That's great, but transparent objects don't show! And how do I get the cool, colored background behind on the thumbnail?" The process is similar to the one above, but you use a rendered image as your thumbnail, as follows... and, again, you only need Poser and Windows Explorer- nothing else!
Again we'll create a new png file for the "WhiteShorts" figure. The steps are similar to the ones listed above: (new steps are in dark blue)
• Start Poser and open the Library containing the figure.
In this example, we would open the Character Library and select the subfolder containing the "Shorts" clothing object.
• Next, go to the Material Room and give the clothing a new color.
• Position the object in the middle of the window as you like it.
• Optional: set the background to whatever color you like.
• Render the scene. (With or without shadows, with or without bump maps; however you like it.)
• Paste the rendered image onto the background by going to Display > Paste Onto Background.
• "De-render" the scene. (Change any parameter dial, change to another camera, or whichever method you prefer.)
• Move the original figure out of the way so you can see the rendered image. For example, click on the Body and set the "xTrans" to 1.
• Add the figure to the Library, but use a different name (for example, add the word "tex" to the end of the name). Poser will create a new figure (or pose) file and a new example file.
In this example, add the figure to the library, and call it "WhiteShortsTex".
The thumbnail will appear- the transparent objects and background color will be rendered correctly.
• Switch to any another Library- Hands, Hair, Props, etc. (This is so Poser will show the new png properly, later.)
• Open Windows Explorer and 'browse' to the Runtime\Libraries\(folder)\(sub-category) folder.
In this example, we will need to go to Runtime\Libraries\Poses\(folder where the "WhiteShort" file is located).
Hint: The sub-category name will correspond to the Pose Library you were just working in.
• Delete the original png, delete the new figure/ pose file, and rename the new png file to match the original pz2.
In this examle, we would delete: "WhiteShorts.png" (the original png) and "WhiteShortsTex.pz2" (the new pose), and rename the "WhiteShortsTex.png" to "WhiteShorts.png".
• Switch over to Poser, re-open your Pose Library, and the png that you created will now correspond with the original figure/ pose.
|
Opening Files in a Text Editor (PC Only):
Have you ever wondered how other people editted their files in a text editor? Poser doesn't allow opening of the files to look at the code and double-clicking on a cr2 files gives you the "Can not find program" message. So, here are the steps to set your PC to always open files in a text editor. Not to worry- even though you are changing the default double-click action, this will not affect how Poser handles the files.
For this example, I'll use cr2 files, but you can repeat the process for any Poser files that can be opened in a text editor, such as: fc2, hr2, lt2, pp2, and pz2.
• Open Windows Explorer.
• Go to Tools > File Options.
• Click on the "File Types" tab (wait for the list to load).
• Under the "Extensions" column, look for "cr2" file. Don't worry if it isn't listed, though.
• To add it:
• Click the "New" button, type "cr2" in the box, and the click "Ok" button. (It should be added to the list.)
• Click the "Advanced" button.
• In the upper text box, type a description for the file. I suggest "Poser Character File" or "Poser Figure File", but it can be anything that you want.
• Click the "Change Icon" button, click "Browse", 'browse' to your Poser folder, and click on Poser.exe to use one of Poser's icons for the cr2 file.
• Click the "New" button to change the file's "default application":
• In the top box, type "open" or "open with Notepad" (or whatever you like- this is the "English" phrase to remind you what will happen when you double-click on the cr2 file).
• For the "Application used to perform this action", click the "Browse" button and find a plain-text editor: I suggest either UltraEdit (available for demo or sale on the Internet) or, better yet, Notepad (for free and already on your PC):
• 'Browse' for it, usually found in the Windows or Windows\System folder. If you don't have this directory, just do a search for notepad.exe and you'll find it.
• Click the "OK" button to close the "Edit File Type" window.
• Click "Apply" or "Close" to close the "Folder Options" window.
|
• If it is listed, here's how to edit it:
• Click the "Advanced" button.
• Type a new description in the upper text box.
• If there are any actions listed, you can edit them as you wish.
|
|
That's it! Windows Explorer should have automatically updated itself and re-labeled your cr2 files. If you want, you can repeat the process for pz2, pp2, or whatever other files you want to add.
P.S. This method is **MUCH** safer than trying to manually edit add it to the registry- in fact, this process is considered the "safe" method and actually adds the entry to the registry for you!
Speed up Rendering (in Poser 4):
Here's a trick that will help speed up the rendering in Poser 4. Although you may not see a huge difference in render times, it does help:
Whenever you render an image, a status box pops up with a guy walking sideways. This guy is actually an avi movie which Poser has to advance as it renders the image. So, the process goes like this: render a section of the image, advance frame of avi, render a section, advance frame, and so on, until the rendering has finished. What if there was a way to remove this movie? Poser wouldn't need to spend the extra time advancing the avi.
It turns out that you CAN remove the avi file without hurting Poser! Here's how:
• First, make sure Poser is closed.
• Open Window Explorer, (or if on a Mac, skip this step).
• Go to your Poser\Runtime\scripts folder.
• Look for a file called "status45.avi".
• Delete this file... or if you're wary about deleting it, rename it (a name like "xstatus45.avi" will work fine).
• Start Poser and render a scene- the guy is gone!
Note: This trick doesn't work in Poser 5 (and above) since there is no more sideways-walking guy- the pop-up box is simply a status bar.