To download this texture (and use it as an example),
click on the image to download the "High-Cut Workout Outfit.zip" file.
In this tutorial you will learn how to use Transparency Maps to "cut" objects. This method is much, much easier (and much faster) than trying to edit the 3-D object itself. With that in mind, here's how to turn the standard Leotard object into a higher-cut "workout" outift:
How did I create this outfit? Here is the tutorial. (Note: you should be somewhat familiar with Photoshop or Paint Shop Pro before continuing.) I know this seems like a lot of steps, but after you do it a few times, you'll get the hang of it.
 1. Start UV Mapper. 1. Start UV Mapper.
2. Go to "File" > "Load Model". (The "Open File" dialog box will open) 3. Go to the directory: "Poser 4\Runtime\Geometries\Poser4Clothes\Suits" and open the file called "blLeotard.obj". (Your screen should look like the screen shot at right.) Beginners note: the left-half of the image is the front of the leotard, the right-half is the back. 4. Go to "File" > "Save Texture Map...". You will get a "BMP Export Options" dialog box- leave the boxes unchecked and click the "OK" button. Next, name the file something like "Female Leotard". Hint: You may want to keep this in a "templates" folder in case you want to use it later. 5. You can close UV Mapper- go to "File" > "Exit". |
 1. Start Photoshop. 1. Start Photoshop.
2. "File" > "Open" the texture map that you just created ("Female Leotard.bmp"). 3. Set the image to RGB Color: "Image" >"Mode" > RGB Color. 4. In the "Layers Palette", click the "Create new layer" button. Double click on this layer ("Layer 1") and change the "Name" to something like "material". This is where we will do our "cutting". 5. Click (once) on the "Background" layer to select it. 6. In the "Tools Palette", click the "Magic Wand Tool" (the  button). button).
7. Click anywhere in the white area surrounding the leotard shapes. 8. In the "Tools Palette", make the background color Black. (Click the "Default Foreground and Background Colors" icon and then the "Switch Foreground and Background Colors" icon.) 9. In the "Layers Palette", click on the "material" layer to select it. 10. Fill the selected area with Black: go to "Edit" > "Fill" and in the "Use" list, select "Background Color" and click the "OK" button. -OR-press the "Ctrl" and "Backspace" keys at the same time. (Your screen should look like the screen shot at right- click on it to see it full-screen) 11. Deselect the image: go to "Select" > "Deselect" -OR- press "Ctrl-D". 12. "Cut" the "front" (the left-hand piece) and the "back" (the right-hand piece) of the object by using the color black. There are three ways to make "cuts":
13. When you are done "cutting", hide the background layer: go to the "Layers Palette" and click the "eye" icon next to the "Background" layer. You should see the "grid" disappear. 14. Finally, save the image: go to "File" > "Save a Copy...". In the "Save" dialog box, choose which file type you prefer- Poser will read BMP, JPG, and TIF. (I prefer JPG because it creates a smaller file size.) Give this image a name: something like "Leotard Hicut" and click the "OK" button. (I use the "Save a Copy" method so I don't have to remember to flatten or unflatten the image- it is done automatically.) 14a. Optional: "File" > "Save" the layered image as a Photoshop file if you want to further refine it later. 15. We are done with Photoshop- you can leave the file and application open or close them, depending on your system. If you have the memory, it is safe to leave Photoshop (and the file) open while working in Poser. |
 1. Start Poser. 1. Start Poser.
2. Load your Female Character. For this example, I will be using a blank scene and only one character- Tabby. 3. Add the Leotard object to your figure: go to "Libraries" (the "pop-out" window on the right) and select "Figures" > "Clothing- Female" (or whatever directory you have the Leotard stored in). Click the Leotard icon and click "Create New Figure" (the  button) button)
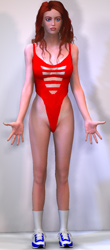
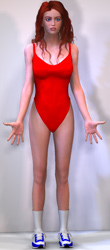
Note: Your Leotard may be a different color- this is normal. (I was sick of the orange color, so I editted the cr2 file to be a red color.) 4. To make things easier, rename the Leotard object: click on any piece of the Leotard object (the pop-up menu below the figure should change to "Figure 2"). Click on the pop-up list to the right (it should list a body part) and select "Body". Go to "Object" > "Properties" and, in the "Name" box, type a new name, such as "Leotard". 5. Conform the Leotard to the Female Character: go to "Figure" > "Conform To...". In the pull-down list, select the Female Character (it should be the only figure listed) and click the "OK" button. Note: if your character has any custom-sized body parts, you may need to do some adjusting so those body parts don't "stick out" of the clothing! 5a. Optional: repeat steps 3-5 if you want to add shoes (right and left) and socks (right and left) to your character. (In this example, Tabby is sporting the latest shoe-wear from Posers' shoe-modeling division.) Your character should look something like Tabby (but probably in a different pose). 6. We will now change the Leotard to use the "cut-out" texture map we created earlier. Go to "Render" > "Materials". In the "Object" pull-down list, select "Leotard". Be sure the pull-down list on the right says "material" and make the changes as seen on this screen shot: 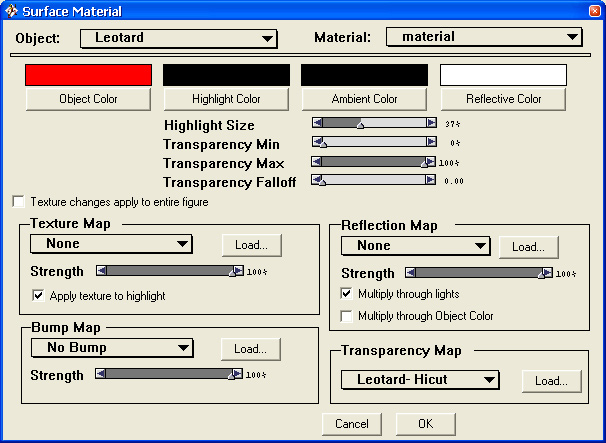 Set the transparency map to the texture we have been using: in the "Transparency Map" section, click the "Load" button. In the "Open" dialog box, select the "Leotard Hicut.jpg" file. Set the transparency map to the texture we have been using: in the "Transparency Map" section, click the "Load" button. In the "Open" dialog box, select the "Leotard Hicut.jpg" file.
For this example, I set the Object Color to red- you can use any color you wish. Click the "OK" button to use the settings. Note: the Leotard will now be see-through and made up of black dots. This is normal- it is the way Poser "preview renders" objects with transparency maps. The objects will look correct when the scene is rendered. 7. Set the Render Options: go to "Render" > "Render Options". Under the "Surface Detail" section, be sure to CHECK "Anti-alias" to smooth-out the image. I usually un-check "Cast shadows" to lighten the scene- shadows tend to darker the image. The rest of the options should be fine the way they are- you can change them to suit your taste. 8. If you want to change anything in the scene, click the "OK" button to close the "Render Options" box, otherwise, click the "Render Now" button to begin rendering. Your character should look something like Tabby (but, again, probably in a different pose). |
That's it- you're done! From here, you can "File" > "Export" the image or click on the figure to continue editing.
Note: you may want to rotate the character to be sure the front and back textures line up at the seams (on either side of the character). You may have to go back to your original image (in Photoshop) and make some adjustments. Then again, experimenting is half the fun!
