How to Make Reflections in Poser 5 (and above)
Unlike Poser 4, the newer versions of Poser come with the FireFly renderer, which is capable of creating true ray-traced reflections. Now, you only need two things to create reflections in your scene: adding an object to reflect and turning "ray-trace" on.
Please note that this method will *not* work with Poser 4. For more information on creating reflections in Poser 4, please read the How to Make Reflections Page.
For ease of reading, whenever you see "Poser 5" in this tutorial, you can safely assume that it means "Poser 5 (and above)".
And, yes, if you look closely, you can see that this is a true reflection... the hair, which is not symmetrical, is reflected correctly.
Applications used:
 Poser 5 (and above)
Steps:
1. First, we will create a new scene to be "reflected":
For this first step, I will assume you know how to add a character to a scene, add clothing to characters, add textures/ coloring to clothing, and pose the character.
Give your character clothing to suit your taste. Color and texture map the clothing to suit your taste. (In the example, Tabby is wearing the default Catsuit with a blue color.)
Pose your character to suit your taste. (In this example, Tabby is using the "See Me" pose, from my "30 Poses for Vicky", available for sale on the Marketplace Page.)
|
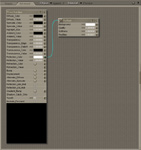
2. Next, add a "mirror" to the scene:
Any object can be made into a "mirror" by simply changing its reflective properties. But, for this example, I'll use the "One-Sided Square" prop. (Note: this is located in either the Poser 5 Library Palette > Props > Primatives or the Poser 4 Library Palette > Props > Prop Types.)
(Note: make sure that the floating "Parameter Dials" Palette is open- we will need to adjust a number of settings on it.)
The flat square will be added to the scene in the very center (and may be in the middle of your character!). Move it back (zTrans) and to one side (xTrans). For this example, I moved the square to zTrans: -0.525 (remember, these are Poser 5 units). I also adjusted the xTrans to -0.345 and the yRotate to 14 degrees so the reflection would be easier to see.
Don't forget to adjust the size of the prop- in this case, the Scale has been set to 300% and the yScale to 250%. (Since it is a flat square, this prop has no width, so you do not need to set the zScale.)
|
|
3. Now, let's make the square into a reflective mirror: (the tricky part)
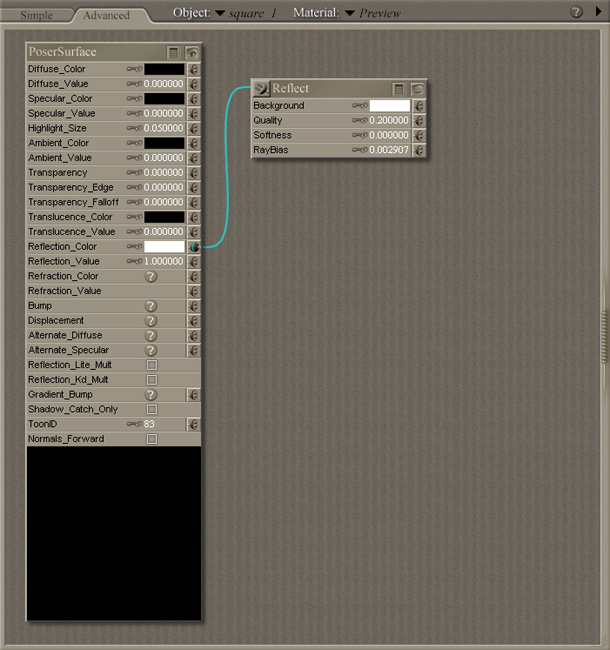
Switch to the Material Room (by clicking on the "Material" Tab) and select the square prop from the pull-down list on the left (next to the word "Object"). You should see a floating palette with the word "PoserSurface".
In order for an object to be reflective, change the following settings:
The Diffuse_Color and Specular_Color can be any color you like, but full black will work the best. (The Diffuse_Color is the color of the mirrored surface: in this case, we want it to look like a mirror, without any color at all. But, you could change it to blue or green to make the mirror look more like a metallic surface, such as car metal.)
If your Diffuse_Color is black, set the Diffuse_Value to 0. This tells Poser that the object has no color of its own.
The Reflection_Color should be set to white (255, 255, 255).
Make sure both the Reflection_Lite_Mult and Reflection_Kd_Mult checkboxes are unchecked.
Left-click on the plug icon next to the "Reflection_Color" node and drag to the the right: this will create a new shader node. In the pop-up menu, select: New node > Lighting > Ray Trace > reflect.
On the Reflect node, set the color to white (255, 255, 255), the Quality to 0.2, and Softness to 0. (You could set the Quality to 1, but this will significantly increase the rendering time and you may not see a significant difference in quality.)
Remember that you can adjust these settings to suit your taste or to create various effects.
|
|
4. Next, let's set the box's properties so it will reflect.
Switch back to the Pose Room (by clicking on the "Pose" Tab).
Click on the "Properties" tab on the "Parameter Dials" palette.
Make sure both the "Visible" and "Visible in Ray Tracing" checkboxes are checked. (By default, they will probably already be checked.)
|
|
5a. Poser 5: Now, let's set the render options so Poser 5 will know to create ray-traced reflections.
Go to Render > Render Options.
Click the button next to the "FireFly Renderer" to enable it. (Remember, the Poser 4 render engine does not support ray-tracing.)
Click the checkbox next to "Raytracing on" to turn it on.
You can change the rest of the options to suit your taste (shadows on/ off, render to new window, etc.). But remember that some options (such as "cast shadows" may increase render times.)
A side note: some people swear that "Production" quality is much better than "Draft", while some people don't think the extra processing time is worth the increase in quality. If you use decent texture maps and lighting, you probably won't need to use the "Production" setting.
Click the "OK" button to apply your changes.
|
|
5b. Poser 6: Now, let's set the render options so Poser 6 will know to create ray-traced reflections.
Go to Render > Render Settings.
Click the tab for "FireFly" to enable it. (Remember, the Poser 4 render engine does not support ray-tracing.)
To keep things easy, leave the "Auto Settings" button enabled.
Drag the slider from left-to-right (or from "Draft" to "Final") until the "Raytracing" box becomes checked. (Raytracing is now enabled.)
Click the "Save Settings" button (which has the same effect as clicking an "OK" button).
|

|
6. Render the scene.
Poser 5: Go to Render > Render.
Poser 6: Go to Render > Render OR click the "Render" button at the top of the Document Window.
Sit back and watch the scene render. Depending on the speed of your computer, rendering could be finished in a few minutes!
When it's done, you should have a nicely rendered scene, similar to the picture at the top of this page!
|
And, to help you get started, click to download the (updated) Poser 5 Material file. Just drop this file into any folder under the Libraries > Materials folder.
There are also some shortcuts that you can consider using:
Poser 5 comes with many "Material Settings" can that be applied to the square prop to make it look like a shiny mirror or even like the metal on a car.
Poser 6 also comes with the Poser 5's "Material Settings", but it also includes "Wacros" to quickly add things like reflection or refraction or subsurface scattering.
And a special thanks to the people at Curious Labs for help in refining this tutorial- my original version told people to plug the Reflect node into the Diffuse Color and Specular Color nodes. They recommended not to plug into these nodes... which results in *much* faster render times.