How to Make Reflections
Without getting into a technical discussion about rendering methods, let me just say that most 3-D applications use ray-tracing as their default rendering method. Poser 4, however, uses a different method- one that is more suited to "organic" objects (such as people). Therefore, there is no way to do a true "mirror image"-type reflection. Is this good or bad? I'm sure this method of rendering saves on processor power and speed, but what if a character stands in front of a mirror to fix his or her hair? Or what if you want a hall of mirrors for your mansion?
With Poser 5, however, true ray-traced reflections are supported with the new "FireFly" engine. You simply add a Reflect "node" to the object's material and it will reflect. For more information on this method, please read the How to Make Reflections in Poser 5 Page.
You may be asking, "What about the 'reflection maps' that come with Poser?" These maps are excellent for creating metallic surfaces and reflective-looking materials, but they don't actually reflect any parts of the scene.
There are four ways around this "limitation":
 You could create the scene, place a camera where the "mirror" should be, and render the scene through that camera. Be sure your lights are "reversed" or your 'reflection' will be too dark. Then, use this rendered image as a texture map for the "mirror" object. You could create the scene, place a camera where the "mirror" should be, and render the scene through that camera. Be sure your lights are "reversed" or your 'reflection' will be too dark. Then, use this rendered image as a texture map for the "mirror" object.
Create the scene, place the camera where the "mirror" should be, render the scene from this point-of-view, and save the image. Again, be sure your lights are properly set. Then, render the scene from the "normal" camera and save this file also. Finally, open both images in Photoshop and composite the images so that the first image is where the mirror should be.
It should be noted that these two methods will only work for single-frame images- in other words, they will not work for animation.
Create the scene by adding your character, any objects in the scene, and then an object (preferably a cube) to act as the "mirror". Next, create a second set of the objects (your character included) on the opposite side of the "mirror", but in opposite positions. This is the method I will show you in the tutorial.
Export your figure (with clothing and hair) to another 3-D application (such as Lightwave or Vue) and use its rendering engine to create reflective surfaces. This method has its own set of pros and cons.
If you have discovered another method (maybe one that is a lot easier to do), please let me know!
|
Anyway, this tutorial will show you how to create a scene where a character is standing in front of a mirror, as shown in this image:
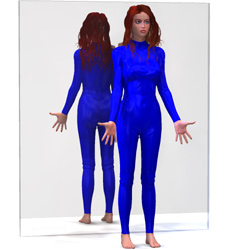
And, yes, if you look closely, you can see that this is a faked reflection... the hair is not symmetrical (there is a "bulge" on the left side), which spoils the illusion.
Applications used:
Poser 4 (yep, only Poser 4)
Steps:
1. First, we will create a new scene to be "reflected". For this tutorial, we will start with a completely blank scene. (For this first step, I will assume you know how to add clothing to characters, add textures/ coloring to clothing, and pose the character.)
2. Next, add an object to become the "mirror". To make things easier, we will turn the "box prop" into a "full-length mirror". You can adjust the dimensions to suit your taste. Remember, though, that we have not added a "wall" to the scene- this means that we may able to see the second, "reflected" character beyond the edge of the "mirror", which may spoil the illusion.
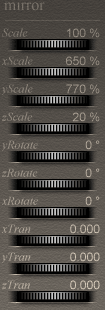
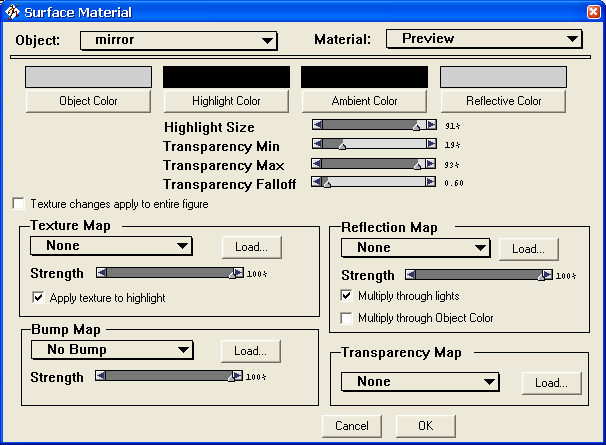
3. We will now need to set the box's color and transparency map.
4. Now that we have a character and a "mirror", let's make the "reflection":
|
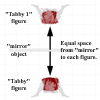
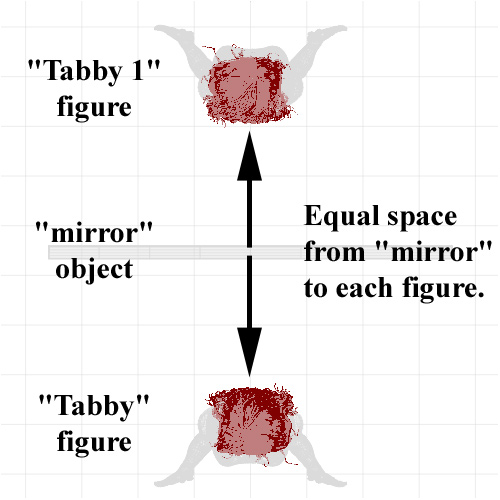
Add your character to the scene again so that there are now two versions of your character. To make things easier, you may want to rename this character something like "character 1". (In the example, I used the name "Tabby 1".)
Rotate this character (yRotate) 180 degrees and move it the same distance as the first character. For instance, if your first character moved to the left of the "mirror", move the second character to the right. (In the example, since Tabby is standing in front of the mirror, zTrans: 0.20, Tabby 1 will be standing in back of the mirror, zTrans: -0.20.)
Note: due to a bug in Poser, rotating the figure 180 degrees may cause conformed clothing (or hair) to "un-conform" and come apart. The solution is to set the yRotate value to just under 180- use a value such as 179.9 and the clothing snaps back in place.
Give the second character the same clothing (and coloring) as the first character. (In the example, since Tabby is wearing the default Catsuit with a blue color, Tabby 1 must wear the same Catsuit with a blue color.)
Pose the second character using the same pose as the first character. There is a "twist", though: the right and left sides must be "swapped": go to "Figure" > "Symmetry" > "Swap Right and Left". (In this example, since Tabby is using the "Hands on Hips" pose, Tabby 1 must be in the same, but "swapped", pose.)
The final result, as seen through the "Top Camera" should look like the screen shot at the right.
|
 |
5. Render the scene (from the main camera, not the top camera) and you are done!

 button) to add the box to your scene. It should appear in the "center" of the scene.