- Start Poser (okay, that's obvious!) and clear everything from the scene.
 Next, add a model to the scene.
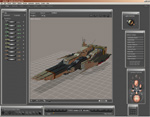
For this tutorial, I'll use the SDF-1, available for free at Vanishing Point.
The screen shot to the right shows the ground plane (the white grid) and ground shadows, neither of which will be exported with the final model.
Note: Keep in mind that WebGL doesn't support Poser shader nodes (or any kind of shader node/ shader blender system). Because of this, you should make sure your model only uses texture maps and colors. Otherwise, your model won't look good... though if you want to show off the shape of your model, Sketchfab lets you choose a non-textured display style. (But that step comes later.)
Next, add a model to the scene.
For this tutorial, I'll use the SDF-1, available for free at Vanishing Point.
The screen shot to the right shows the ground plane (the white grid) and ground shadows, neither of which will be exported with the final model.
Note: Keep in mind that WebGL doesn't support Poser shader nodes (or any kind of shader node/ shader blender system). Because of this, you should make sure your model only uses texture maps and colors. Otherwise, your model won't look good... though if you want to show off the shape of your model, Sketchfab lets you choose a non-textured display style. (But that step comes later.)
- Next, export the model: go to File > Export > Collada|RBY
 On the first dialog box, use the default setting of Single Frame and click the OK button.
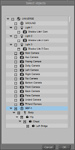
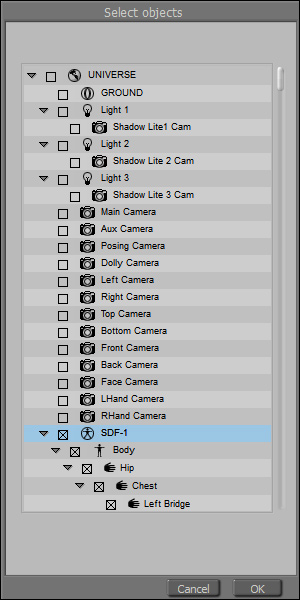
On the next dialog box, you'll want to select only the models you want exported. In this case, I'll select only the SDF-1 model. I'll do this by first unchecking everything in the scene by clicking on the box on the top line next to the word "UNIVERSE". Then, I'll select only the SDF-1 by clicking on the box next to the word "SDF-1".
Note: If you have multiple props or models, make sure to select all of them by scrolling down and putting an X in the box.
Optional: Sketchfab supports scene lights, so feel free to experiment with exporting the lights with your model.
Click OK when done.
Then, choose where to save the file. I recommend creating a new, temporary folder for the model and textures. Don't forget to name the model something besides the default "preferredState.dae".
On the first dialog box, use the default setting of Single Frame and click the OK button.
On the next dialog box, you'll want to select only the models you want exported. In this case, I'll select only the SDF-1 model. I'll do this by first unchecking everything in the scene by clicking on the box on the top line next to the word "UNIVERSE". Then, I'll select only the SDF-1 by clicking on the box next to the word "SDF-1".
Note: If you have multiple props or models, make sure to select all of them by scrolling down and putting an X in the box.
Optional: Sketchfab supports scene lights, so feel free to experiment with exporting the lights with your model.
Click OK when done.
Then, choose where to save the file. I recommend creating a new, temporary folder for the model and textures. Don't forget to name the model something besides the default "preferredState.dae".
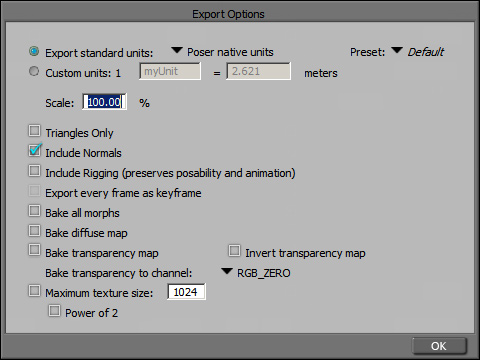
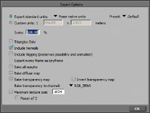 On the Export Options screen, you'll want to uncheck all of the options except "Include Normals". See the screen shot for the options that I use.
Click OK when done.
You may get another dialog box asking you to select the morphs. If your model has morphs, you can select them here. Otherwise, you don't need to change or select anything- just click the OK button.
The export process is done!
On the Export Options screen, you'll want to uncheck all of the options except "Include Normals". See the screen shot for the options that I use.
Click OK when done.
You may get another dialog box asking you to select the morphs. If your model has morphs, you can select them here. Otherwise, you don't need to change or select anything- just click the OK button.
The export process is done!
- Now you'll need to collect all the textures used by the model. Normally, this would be a tedious task of looking through the materials and copying & pasting the image files. But Poser includes a handy Python script to do this for you, called "Collect Scene Inventory".
First, open the Python Scripts Palette: go to Windows > Python Scripts.
On the Python Scripts palette, click the "Utlity Funcs" button.
Then click the "Collect Scene Inventory" button.
Poser will display a dialog box to choose an option. Click on the down-arrow next to the word "None" to choose from "List files" or "Copy all to folder".
Select "Copy all to folder" and click the OK button.
Browse to the folder where you saved the Collada file.
You're actually now saving a scene file, so name it the same as the Collada file.
Click the Save button and watch as Poser opens a pop-up window and lists the files it copies.
(You can close the pop-up window.)
- Next, open Windows Explorer and go to the folder where you've been saving the files.
You can delete the following files:
- (model.obj)
- camera.obj
- camera.obz
- (model.pz3)
- Ground Default Texture.tif You should be left with "model.dae" (the Collada file) and all the texture, bump, and reflection maps
Zip all the files into one zip file.
- Now open your web browser and go to Sketchfab.
You'll need an account to upload models: you can get a free account that allows you to upload 10 models or a Pro account (for a monthly fee) that allows you to upload 100 models.
Once you have an account, go to your dashboard (by clicking the "Dashboard" button).
Click the "Add New Model" button.
Click the "Browse" button and browse to the folder where you saved the model and created the zip file.
Select the zip file NOT the Collada/ dae file.
Click the Upload button and let Sketchfab do its thing.
- When the model is fully uploaded, you can adjust the settings, using the controls on the right side of the screen, such as the name, key words, description, and display style.
Experiment with the Cubemap settings (to add a background image behind your model) or SSAO (to adjust the Ambient Occlusion). Click the "Help" links for more information.
On the upper-left is a camera icon which is used to create a snapshot-preview: rotate the model so it looks the best and then click the camera icon.
When you're done, click the Save button at the bottom.
- Now that the model is saved, you can start posting a link to it!
There are two ways to do this:
1) Use the Link code to post a link to the model's page on Sketchfab.
2) Or (my favorite), use the Embed code to post an iframe with the model itself! Click on the code and copy it to the clipboard by either right-clicking > Copy or hitting Ctrl-C.
Then go your website and paste the code.
I've found that the iframe works on sites which accept HTML (or, obviously, within the code of your own website). If you're using the Sketchfab model to help sell your digital model, the product description field at Vanishing Point and Renderosity will accept the iframe code.
Facebook will not accept the iframe code, but it will accept the link code, complete with the snapshot-preview of your model.
Optional: you can delete the files in your model's folder since they're no longer needed.
Yes, but those versions do not have the ability to export in Collada format.
Yes, but I've found that Collada works the best. Both 3ds and obj formats don't convert well: either the textures are wrong or the transparency (on materials such as windows) is wrong. Plus, there's no way to edit the individual materials once the model is on the Sketchfab site
This hasn't worked for any of my models, but you can feel free to try it and see what happens. Sketchfab may add this feature later.
Yes and no. Facebook itself doesn't support iframes, but it can be done by adding a 3rd-party add-in. Sketchfab has a short tutorial on their site about how to do this under their section on How to embed a model?
Read for yourself at their site: Sketchfab FAQ's.
