Creating Images with Motion-Blur in Poser 5 and 6

With motion-blur, you can quickly add a sense of motion to your scene... without using compositing or even another piece of software. How is done? Basically, you need to set up an animation, create 2 keyframes, move the object to be blurred, and then render one image in the middle of the animation. So, although this tutorial uses Poser 5, it can be applied to any software that allows motion blur as an option (Poser 4 can not, but programs like Lightwave and 3D Studio Max can).

As with the previous tutorials, this one uses Poser 5, but the steps are exactly the same in Poser 6.

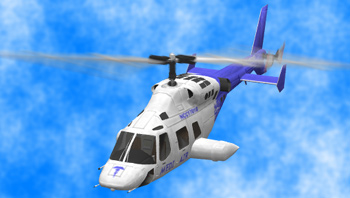
For this tutorial, I will be using my Bell 222 Executive Helicopter model, found at the Vanishing Point Marketplace, but you can use any model you like. (Note: links open in a new window.)

Bell 222 final image.

Applications used:

 Poser 5

Steps:

1. First, we will create a new scene and add the object to the scene. In this case, the Bell 222 Executive Helicopter model.

 Set your camera to whatever setting you like- angle, position, focal length, etc.
 Add a light set to suit your taste.
 Add additional figures or props to suit your taste.

Poser 5 screen shot with Bell 222, smooth shaded display mode

2. Next, create a keyframe at Frame 1.

 Click the "handle" at the bottom of the screen to open the Animation Controls. (Or go to Window > Animation Controls.)
 Since everything is fine the way it is, click the "+" button to create a new keyframe.

Animation palette

3. Now, we'll create a second keyframe so things will move.

 In the Animation Controls, go to the last frame by moving the orange slider-triangle to the far right (or click the "001" and type in "30".)
 Select the object that will be blurred. In this example, I want the upper blades to rotate.
 Open the Parameter Dials Palette and set the maximum value for the object that will move. In this example, I adjusted the "RotateUpperBlade" dial to 14000.
Note: We could do a little math to figure out the maximum value. Poser 5's current frame rate is 30 frames per second and we will set a keyframe at frame 30. This means that our animation will be 1 second long. How far will the object move or rotate in the space of one second? Better yet, let's just keep these things in mind... and not worry about trying calculate actual physics. After all, we want the blurring to look "good", but not necessarily "realistic".
 Adjust any other parts that will move: In this example, I adjusted the "RotateRearBlades" dial to 7500.
 Click the "+" button to create the second keyframe at frame 30.

Second keyframe

4. Optional: Click the "Play" button (the triangle button on the left-hand side of the Animation Controls) to preview the animation.

5. In the real world, we would need to adjust the camera's shutter speed: the longer the shutter is open (and the faster an object moves), the more the object will be blurred.

 In Poser, the camera properties that need adjusting are on the Render Options screen, so go to Render > Render Options.
 On the right-hand side of the window, you'll see settings for "3D motion blur on". Click the checkbox to turn it on. For now, we'll leave the default settings at 0 and 0.5, but you may want to adjust them later to suit your taste.
Note: The "Shutter Open" and "Shutter Close" controls work like a real camera- the longer the shutter is open, the more blur you will get.
 While this window is open, feel free to adjust the other settings to suit your taste: Do you want Cast shadows? Do you want to Render over the current background color, a background image, or a background shader? (In this example, I changed the background color to a light blue.) Do you want to Render to a new window?
 Important note: Motion blur will not work with the Poser 4 Renderer. You must use the FireFly Renderer, in either Draft or Production mode.
 Click the OK button when you're finished.

Render options

Note: Unfortunately, Poser 6 does not include any way to change the options for the motion blur: you check the box for "3D Motion Blur" and that's it.

5a. (Optional) Let's have this helicopter flying through the sky by using Poser 5's background shaders to create some basic clouds. (You can also use this technique to create other basic patterns, such as metal or brick.)

 Click on the Materials tab to open the Materials Editor.
 Select the Background by clicking on the pull-down box to the right of the word "Object".
 Click on the "BG Movie", "BG Picture" and "Black" shaders and hit the Delete key to remove them- we don't need these shaders. (Though, due to a bug in Poser, they will re-appear the next time you come back to the Materials Editor.)
 On the "BG Color" shader, click on the right "plug" icon (under the closed "eye").
 Go to New Node > 3D Textures > Clouds to attach a "clouds" node.
Note: The document window will not display the background shader, even in full textured display mode, so don't panic if the background doesn't change.
 Use the current colors and settings or adjust them to suit your taste.
 Click on the Pose tab to return to the Pose Room.
Note: Be sure to go back to the "Render Options" screen and check the option for "Render Over" "Background Shader".

Background shader settings

6. In the Animation Controls, move the orange triangle-slider anywhere you like- we have 30 frames to choose from.

7. Render the scene!

 Go to Render > Render.
 Look at the results to see if you're happy with the image. If not, you can change the following:
-Go back to step 3 and re-adjust the maximum value of the part that is moving. Be sure to click on the "+" button again to re-create the keyframe.
-Go back to step 5 and adjust the values for Shutter Open and Shutter Close.
-Go back to step 5a and adjust the background color or shader.
-Go back to step 6 and select another frame to render.

Final, rendered image

7a. Poser 6 users can use the new "compare render" feature (at the bottom of the document window) to compare each render and see which one they like the best.

Additional notes:
 You can always use the Render > "Motion Blur Document" option to get an approximation of what the blurring will look like. But, since this blurring affects the document window, it is not an actual render... and you won't see any special-effects drawn correctly (such as transparency or bump maps).
 If you prefer working in Poser 4, you can set up your scene there: add objects to the scene, add a background image, etc. You can even set the keyframes for the animation. However, you will have to save everything as pz3 file (Poser scene file), close Poser 4, open the scene in Poser 5, and then render it.