1. First, add the default P4 Female to an empty scene. Don't change the pose or the texture yet.
2. Add some hair to the figure. I used the Female Hair 1 (default color), but you can use whichever style suits your taste.
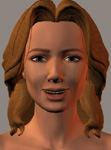
3. Switch to the "Face Camera" so you can easily see the changes. (Your screen should look similar to the "before" shot, as seen above.)
4. Now, we will have some fun with her face: Be sure to click anywhere on the "Head" object to select it. (I know it sounds obvious, but I don't want to leave out any steps.)
 It's probably obvious what each dial does- "RoundFace" makes the face rounder, "LongFace" makes the face longer. But, some dials also work opposite of each other- setting the "Smile" dial to a negative number causes the face to "Frown" more. And with the Vicky and Mike figures, there are some morph targets that are affected by the body's morphing! It's probably obvious what each dial does- "RoundFace" makes the face rounder, "LongFace" makes the face longer. But, some dials also work opposite of each other- setting the "Smile" dial to a negative number causes the face to "Frown" more. And with the Vicky and Mike figures, there are some morph targets that are affected by the body's morphing!
You should experiment with the dials to get a feel for how each one affects the face. Watch what happens if you set a dial too high (or too low). Also, be sure to rotate the camera to see how the face looks from various angles.
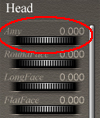
For this example, here are the Parameter Dial settings I used to create "Amy":
Note: It took me less than five minutes to produce Amy's face for this tutorial. However, it took me about half an hour (or so) to create Sheri's face. But, you should probably plan to spend longer than that when using figures with numerous morph targets. Spend as much, or as little, time as you like. In theory, if you spend enough time adjusting the morph targets (especially on higher-polygon models such as Mike 2 or Vicky 3), you could get the figure's face to look like a real person.
| RoundFace |
-0.259 |
| LongFace |
-0.206 |
| FlatFace |
0.00 |
| HeartFace |
-0.020 |
| SquareFace |
0.00 |
| FlatBridge |
0.495 |
| JawStrength |
0.00 |
| Eyes |
0.041 |
| Brow |
-0.586 |
| Lashes |
0.177 |
| BumpNose |
-1.00 |
| FlatNose |
-1.00 |
| PointedNose |
0.00 |
| RoundNose |
0.00 |
| Cheeks |
-0.50 |
| Chin |
0.00 |
| Lips |
0.00 |
| OpenLips |
0.356 |
| Smile |
0.622 |
| Frown |
-0.465 |
Keep in mind that some settings (such as "Smile") may be affected by the character's pose or facial expression- both of which can be set later.
|
5. After you are satisfied with the Parameter Dial settings, you should "lock" the settings:
 Go to "Object" > "Spawn Morph Target". Go to "Object" > "Spawn Morph Target".
Give the "Morph" a name. (For this example, I called the morph, "Amy".)
Click the "OK" button to close this dialog box.
A new Parameter Dial should now be added to the top of the list: this is your "morph target" (in this example, "Amy").
Since your "face" has now been "saved", you can now reset all the other Parameter Dials back to zero.
To use the new face, just turn the new dial up to 1.00. Whenever you pose your character, she will always have this basic face.
|
To make the character even more unique, experiment with both the different hair styles/ colors and the various texture maps.
Don't forget to save your character: "File" > "Save" the entire scene as a Poser file OR open the Library Palette > Faces > (any set) and click "Add" (the  button). button).
|