Animating the 'Floating Kick' Scene in The Matrix
In the opening scenes of the movie, The Matrix (released by Warner Bros. and now available on DVD and video), the character Trinity (played by Carrie-Ann Moss) is cornered by a number of policemen. During a fight scene, she walks up a wall to avoid bullets and then does a "jump-kick"- she jumps up in the air, freezes as the camera pans around, and then kicks the policeman. So, how did they do it?
In the movie, the directors shot film footage of Trinity "jumping" (actually, she was lifted up by cables), and when she was at the top of the jump, a number of still cameras, arranged in a circle around her, shot pictures at the same time. Then, the film footage continued as she kicked the policeman. The still shots were then edited together (and computer-enhanced) to give the illusion of one camera panning around the scene. The edited "still film" was then added to the "lead-in" and "lead-out" film to complete the shot.
How do we do it in Poser? The theory is the same: pose/ animate the characters in a jump or kick, rotate/ orbit the camera (and "freeze" the characters), and then continue animating the characters. Here is what the keyframes would look like:
Applications used:
Poser 4
Optional: a "movie playback" application to play the rendered animation. This is not a required application since Poser can play back your movie file (go to: "Animation" > "Play Movie File...").
Steps:
- Animation Settings. These can be changed to suit your taste, depending on whether you want your action to be faster or slower. For the sample .avi, I used more frames so the action may seem a little slower, but it is easier to see what is happening. (Looking back, I probably should have made the animation end at keyframe 70 or 80 so the kick would be more "explosive.")
For this tutorial, we will use the following. Note: we are not actually changing or setting anything in the step, but just "plotting out" the sequence of events.
| Rate: |
30 frames per second |
| Length: |
90 frames/ 3 seconds |
| Keyframe 1: |
(1, to start the animation) |
| Keyframe 2: |
30, for the "jump" pose and start of the camera rotation |
| Keyframe 3: |
60, for the end of the camera rotation and the start of the "kick" pose |
| Keyframe 4: |
90, for the end "kick"pose |
| Viewing Camera: |
use the Main Camera |
Note: This animation does not have any "lead-in" animation- it starts with the Trinity character jumping. For more realism, you may want to add a fight scene in front of the "jump-kick".
- Adding Characters to the Scene.
- Start with a blank scene or open/ add a female character. I will be using my own character, Jen, to act as Trinity. Be sure she is at xTrans: 0.00, yTrans: 0.00, and zTrans: 0.00 (the center of the scene). Add clothing to her to suit your taste- Jen is wearing the Unitard with a custom transparency map and the Running Shoes. Next, pose her in a "starting to jump" pose.
- Add the second character to the scene. In this case, I have used a policeman, but you can use any character you like. Clothe this character to suit your taste (this policeman character already comes with a uniform). Since he may appear on top of the first character, you will need to rotate and move him: select the Figure, then select "Body" and change the yRotate to 180 degrees (to have him face the female character). Next, move him just out of reach of her kick: adjust the zTrans to somewhere between 0.45 and 0.50 (adjust to suit your taste). For the .avi sample, I used a zTrans value of 0.45.
- Optional: for added realism, click on the first figure (Jen), and have her eyes "Point At.." the second figure's (the policeman's) head. This way, when the camera is rotated, her eyes won't look in a strange direction.
- Create a floor. Go to: "Display" > "Guides" > "Ground Plane" and be sure there is a check next to it. Next, go to the Parameter Dials for the Ground and set the "Scale" to 120%. Add a Texture Map or color to suit your taste. For the .avi sample, I used Poser's default "Ground Plane Texture" and colored it green in Photoshop.
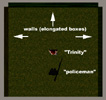
- For added realism and contrast, add three background walls- left, behind, and right. For the .avi sample, I selected the "box" prop which was then stretched and texture-mapped.
- Open the "Library Palette" and click the "Props" > "Box" and "Apply Library Preset" (the
 button). (This will add a box the scene at the center of the scene, on top of the first figure.) Repeat this step 2 more times so there are now three boxes in the scene. Set the options in the "Parameter Dials" as follows: button). (This will add a box the scene at the center of the scene, on top of the first figure.) Repeat this step 2 more times so there are now three boxes in the scene. Set the options in the "Parameter Dials" as follows:
|
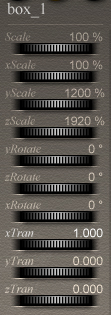
Box 1 ('right wall') settings. |
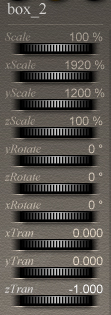
Box 2 ('back wall') settings. |
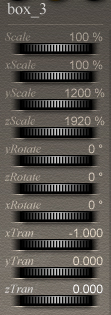
Box 3 ('left wall') settings. |
|
| * Note: the yScale setting is the height of the "walls"- adjust to suit your taste. |
- Next, "colorize" the walls. You could use a solid color if you like, but the movement will seem sharper if you use a texture map. For the sample .avi, I used some "wood" textures and colored them green in Photoshop.
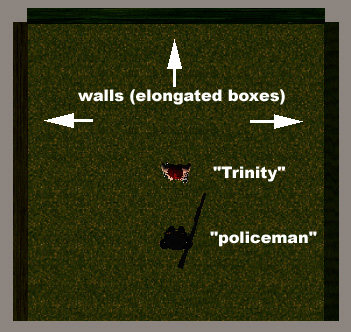
- Your scene should look similar to the screen shot below (as seen from the "Top Camera").
- Setting the Elements (Keyframe 1)- starting the animation:
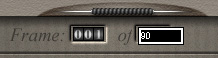
- Set the starting animation length and starting point: Open the "Animation Controls Palette" and click on the right-hand number to set the length of the animation. For the sample .avi (and this example), we will type "090". Make sure the left-hand value says "001" so our work will start on the first frame.
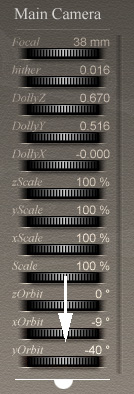
- Set the camera position: Move the camera to a 3/4 left-view by setting the Main Camera's "Parameter Dial" > "yOrbit" to a value between -35 degrees and -50 degrees (adjust this to suit your taste). For the sample .avi, I used a value of -40 degrees. Note: be careful of the setting- if the value is too high, the wall may block the camera's view.
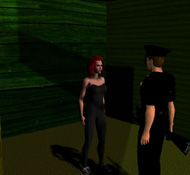
- Set "Trinity's" starting pose- she could be standing or getting ready to jump (see screen shot #1). Adjust to suit your taste.
- Set the policeman's starting pose- he could he standing or ready to fight (see screen shot #1). Adjust to suit your taste.
- Setting the Elements (Keyframe 60)- camera rotate:
- In the "Animation Controls Palette", click on the left-hand number and type "060" to work on Keyframe 60. "Add a Keyframe" by clicking the "+" button (on the right-hand side of the "Animation Controls Palette".
|
|
- Set the camera position: Move the camera to a 3/4 right-view by setting the Main Camera's "Parameter Dial" > "yOrbit" to a value between 35 degrees and 50 degrees (adjust this to suit your taste). For the sample .avi, I used a value of 40 degrees. Note: be careful of the setting- if the value is too high, the wall may block the camera's view.
|
|
- Setting the Elements (Keyframe 30)- figure movement/ camera non-rotation:
- In the "Animation Controls Palette", click on the left-hand number and type "030" to work on Keyframe 30. "Add a Keyframe" by clicking the "+" button (on the right-hand side of the "Animation Controls Palette".
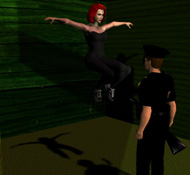
- Set "Trinity" in a ready-to-kick pose (see screen shot #2). Also, set her "Body" element's "Parameter Dial" > "yTran" to a value between 0.2 and 0.4 (so she will be in the air). Adjust the pose and "yTran" to suit your taste.
- Set the policeman's starting pose- he could he still standing or ready to fight or even in a "what's going on?" pose (see screen shot #2). Adjust to suit your taste.
For the two characters, you could try finding a "Fighting Set" or "Martial Arts Set" of poses on the Internet, but wouldn't it be more fun creating the poses yourself?
- Set the camera: If you've done animation before, you've probably realized that we have the camera stopping its rotation at frame 60. But when did it start rotating? Well, by default, it started at the last set keyframe, which is "keyframe 1". We will have to change this:
- Open the Animation Controls: Go to the "Window" menu > "Animation Palette" (or click the "Edit Keyframes" button on the "Animation Controls Palette".
- Click on the Main Camera object (you may have to collapse the other objects or scroll down).
|
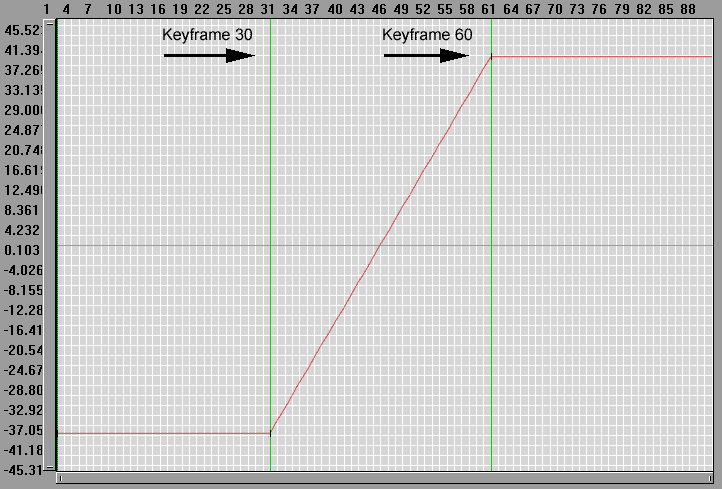
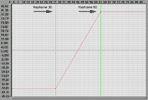
- We will need to edit the "movement graph" of the Main Camera's rotation (the yOrbit): Click the "Show Graph Display" button (the wavy red line button) to open the window.
- Click on the "tick mark" at Keyframe 1 and then click the "Constant Section" button. This tells the animation not to move the camera, starting at Keyframe 1.
- Click on the "tick mark" at Keyframe 30 and drag the mark (up or down) so the line on the left is horizontal. Next, click the "Linear Section" button. This tells the animation to move the camera evenly, starting at Keyframe 30.
The graph should now be: straight, angle up, and then straight.
|
|
- Close the "Graph Display" window. (There is no "Save your change?" option- the changes will automatically take effect.
- Close the "Animation Palette Window".
|
- Setting the Elements (Keyframe 90)- figure movement/ camera non-rotation:
- In the "Animation Controls Palette", click on the left-hand number and type "090" to work on Keyframe 90. "Add a Keyframe" by clicking the "+" button (on the right-hand side of the "Animation Controls Palette".
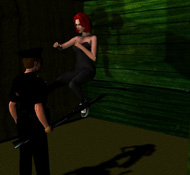
- Set "Trinity" in a "kicking the policeman" pose (see screen shot #4). Also, adjust her "Body" element's "Parameter Dial" > "zTran" so her foot hits the policeman. Adjust the pose to suit your taste.
- Set the policeman's pose to suit your taste (if you pose him at all). Note: Be careful if you pose him in a "falling backwards" pose- when you playback the animation, it will seem like he's reacting to the kick before he is kicked!
- Preview the results:
- For "real-time" playback, set the display to "Faster Tracking" and be sure "Show All Frames" option is turned on. You should see the following:
- Frame 1 to 30: "Trinity" jumps into the air as the policeman "reacts".
- Frame 30 to 60: characters "freeze" as the camera rotates around the scene.
- Frame 60 to 90: "Trinity" kicks the policeman.
- Fine-tuning the Elements:
- You may see "Trinity" moving slightly between frames 30 and 60 (when she shouldn't be moving). To correct this, you will have to "edit out" the movement in the Animation Palette:
- Open the "Animation Palette" again.
- Find the female character (in this example, "Jen") and make sure all the figure's elements are displayed.
- In the "grid", locate the body parts that seem to be moving. (In the sample .avi, the right and left shoulders, and the right and left thighs.) Click on the box under (Frame) "30" (this should be the intersection of "30" and the body part). Press the "Delete" key. This will "freeze" her motion from "Keyframe 30" to "Keyframe 60".
- Close the "Animation Palette" window, preview the animation, and fine-tune again (as needed).
- Creating the animated movie:
- Set the rendering options: Go to "Render" > "Render Options". Be sure "Anti-Alias" is checked. For added realism and contrast, check "Cast Shadows" (this may increase render times).
- Start rendering: Go to "Animation" > "Make Movie". Give the animation a name and click on the options to suit your taste (AVI or Quicktime format), window size, etc. There's no need to change the "Frame Rate" settings- they have been set already. Note: although it may be obvious to some people, the larger your final window size (especially with the "Cast Shadows" option) the larger the render time. In other words, start the animation rendering, go eat dinner, and come back later!
In the .avi sample movie, I used:
The character of Jen (and her pose) is my own creation.
Jen's outfit is the Unitard clothing figure (with my own transparency map) and the right and left Running Shoe clothing figures.
The policeman character is "LawBoy" created by Greg Crowfoot and can by found on the Greylight's Poser Archives. His pose is the "Standing Sets" > "Confrontation" (included with the Poser application).
The ground plane uses the default "Ground Plane Texture" but re-colored a green hue (using the "Variations" command in Photoshop).
The walls are colored using "wood" texture maps (colored a green hue) from a "Wood Texture Pack".