Now, the eyes will probably look very strange... they are pointing almost straight down!
Okay, you've purchased Poser 4, read some tutorials on how to make the best-looking renders... but something's still missing. Your characters still look "flat" and "lifeless". What else can you do to give them a little more "life"? Here are some tricks that I have been using on my own "soft-focus" images.
Have you ever worked on an image to make it just-right, only to have someone comment that the character seems to be vacantly staring into space? Sure, you could position the eyes so that they look forward, but changing the pose will change the position of the eyes. The easiest solution? Add a prop (such as a ball), point the eyes at the ball, and then move the ball- the eyes will follow and the character will seem to be looking a point, rather than blankly staring at nothing. How do we do it?
1. Open Poser and start with a blank scene. Add your character to the scene. At this point, don't worry about other details, such as clothing, poses, or lighting.
2. Add a ball to the scene: Libraries > Props > Prop Types > Ball. (It will be added at the center of the scene, probably just between your character's feet.)
3. Next, we'll need to make the ball invisible. You could use the Hierarchy Editor and hide it, but I prefer to make it transparent using the Materials Editor. Go to Render > Materials and select the ball. Set the object color to whatever you like (it doesn't matter since it will be invisible). Set the Highlight Color to black (0, 0, 0), set the Transparency Min and Transparency Max to 100%, and set the Transparency FallOff to 0. Click the OK button when done (or switch back to the Pose Room).
4. Point the eyes at the ball:
![]() Select the Right Eye: either click on it or select it from the listing of body parts.
Select the Right Eye: either click on it or select it from the listing of body parts.
![]() Go to Object > Point at.
Go to Object > Point at.
![]() Scroll down the list, click on the ball, and click the OK button.
Scroll down the list, click on the ball, and click the OK button.
![]() Select the Left Eye: either click on it or select it from the listing of body parts.
Select the Left Eye: either click on it or select it from the listing of body parts.
![]() Go to Object > Point at.
Go to Object > Point at.
![]() Scroll down the list, click on the ball, and click the OK button.
Scroll down the list, click on the ball, and click the OK button.
Now, the eyes will probably look very strange... they are pointing almost straight down!
5. Move the ball and watch the eyes follow- I suggest using the xTrans, yTrans, and zTrans dials rather than trying to move it with the tools.
![]() Move the ball up to eye-level: use a yTrans setting of about 0.6 to 0.7. Note: if you character is sitting, don't forget to move the ball down to a setting around 0.2 or 0.3... or higher if the character is looking up.
Move the ball up to eye-level: use a yTrans setting of about 0.6 to 0.7. Note: if you character is sitting, don't forget to move the ball down to a setting around 0.2 or 0.3... or higher if the character is looking up.
![]() Move the ball forward: use a zTrans setting of about 1.0 to 2.0. The larger this value, the less cross-eyed the character will look.
Move the ball forward: use a zTrans setting of about 1.0 to 2.0. The larger this value, the less cross-eyed the character will look.
6. Continue with the image: add clothes, props, pose your figure, etc. Then, move the ball so that the eyes are looking in the direction that best suits the image.
Optional: If you have 2 characters in the scene, you can have one character look at the other by moving the ball so that it is behind the second character.
Optional 2: If you prefer, you could rename the ball to something more meaningful. Select the ball, then go to Object > Properties. Type a new name- maybe something like "eye ball".
To add more emphasis to your character, try brightening the eyes. Go to the Materials Editor and select the Iris (the part of the eye with the color):
![]() Set the Highlight Color to light gray, such as 207, 207, 207.
Set the Highlight Color to light gray, such as 207, 207, 207.
![]() Set the Ambient Color to a dark gray, such as 63, 63, 63.
Set the Ambient Color to a dark gray, such as 63, 63, 63.
![]() Or, set the Ambient Color to a very dark version of your character's eyes. For example, if your character has blue eyes, try setting the Ambient Color to dark blue, such as 0, 0, 32.
Or, set the Ambient Color to a very dark version of your character's eyes. For example, if your character has blue eyes, try setting the Ambient Color to dark blue, such as 0, 0, 32.
![]() Experiment with reflection maps. This could work well if you use the background image as a reflection map. However, keep your total image in mind: the reflection map works best when seen up-close, such as a portrait. It may not work as well in a longer shot.
Experiment with reflection maps. This could work well if you use the background image as a reflection map. However, keep your total image in mind: the reflection map works best when seen up-close, such as a portrait. It may not work as well in a longer shot.
This technique also works well for brightening the lips: experiment with the Highlight and Ambient colors to suit your taste.
Another trick to creating brighter eyes is to add a light highlight to the texture map itself:
![]() Open the image in an image editor (such as Photoshop or Paint Shop Pro).
Open the image in an image editor (such as Photoshop or Paint Shop Pro).
![]() Create a new layer and draw a white circle in the upper-left portion of the Iris (the colored area).
Create a new layer and draw a white circle in the upper-left portion of the Iris (the colored area).
![]() Adjust the layer's various effects (transparency, multiple, soft light, dodge, etc) to suit your taste- do you want the highlight to be pure white or a lighter version of the color?
Adjust the layer's various effects (transparency, multiple, soft light, dodge, etc) to suit your taste- do you want the highlight to be pure white or a lighter version of the color?
![]() Use a layer mask (or eraser) to keep the Pupil (the black area) a solid black color.
Use a layer mask (or eraser) to keep the Pupil (the black area) a solid black color.
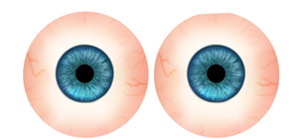
Eye texture map without highlight. |
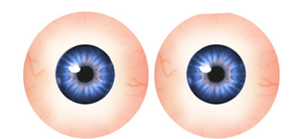
Eye texture map with highlight and modified blue tint. |
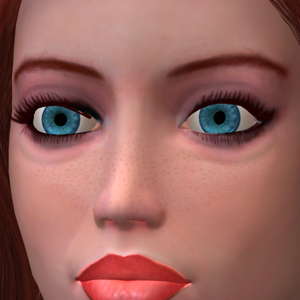
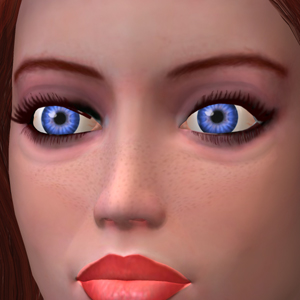
Compare these two rendered images. The image on the left is the base texture. The image on the right has the modifications explained in the previous tips. (I also brightened the EyeWhite material.) Personally, I think the the eyes in the left image look a little dull and flat, while the eyes in the right image seem to be more "alive".
Iris with "plain" texture map, Object Color: white, Highlight Color: black, Ambient Color: black. |
Iris with "highlight" texture map, Object Color: white, Highlight Color: light gray, Ambient Color: dark blue. |
